Travis CI for iOS projects
In the past couple days I tried to find the most exhaustive tutorial that would tell me how to set up Travis CI for our iOS project in a reasonable amount of time. I didn’t want anything fancy, anything out of the ordinary, just a simple step-by-step tutorial that would lead me to the desired outcome. No luck, so here it is - how to set Travis up from start to finish for an iOS project.
Project components
Usual suspects:
- Swift project
- CocoaPods
- GitHub
What am I trying to achieve?
To start with, I would like to set up a pipeline for automatic project building and code check. Later on, I would like to add automatic test scheduling and deployment to beta testers or the App Store. It’s important to get the repetitive work out of the way as soon as possible. If a server can do it automatically, don’t do it yourself. Save precious time for tedious bugs.
Travis website
First, you have to register on the Travis CI website. Because our project is hosted on GitHub and Travis is neatly integrated with GitHub, go for Sign in with GitHub. By signing in you give consent to Travis to:
- Read org and team membership
- Access commit status
- Access deployment status
- Access user email addresses (read-only)
- Write repository hooks
In fact this is nothing unusual as most CI tools require these in order to function properly. You can read more about third-party access here. Little side note - to be able to allow Travis in an organizational repo, you have to be the Owner (have full access rights in the organization).
Travis project setup
Once you’ve signed in, you can see all your repositories and organizations. Find your repository and click the switch where you want to allow Travis to operate.

When you’ve done that, click the gear icon to proceed to settings. I personally prefer to turn on the option Build only if .travis.yml is present. I don’t want it to do anything before I’ve told it exactly what to do (.travis.yml is the “recipe” for Travis). Otherwise Jekyll starts a default image and build recipe which may be totally useless anyway. That’s pretty much it for now regarding the website. Don’t close it yet, just leave the tab open - we’ll come back to it in a minute.
Revoking access
In case you ever feel like revoking the access for Travis, simply go to Profile > Settings > OAuth applications and there you’ll find the whole list of all authorized applications.
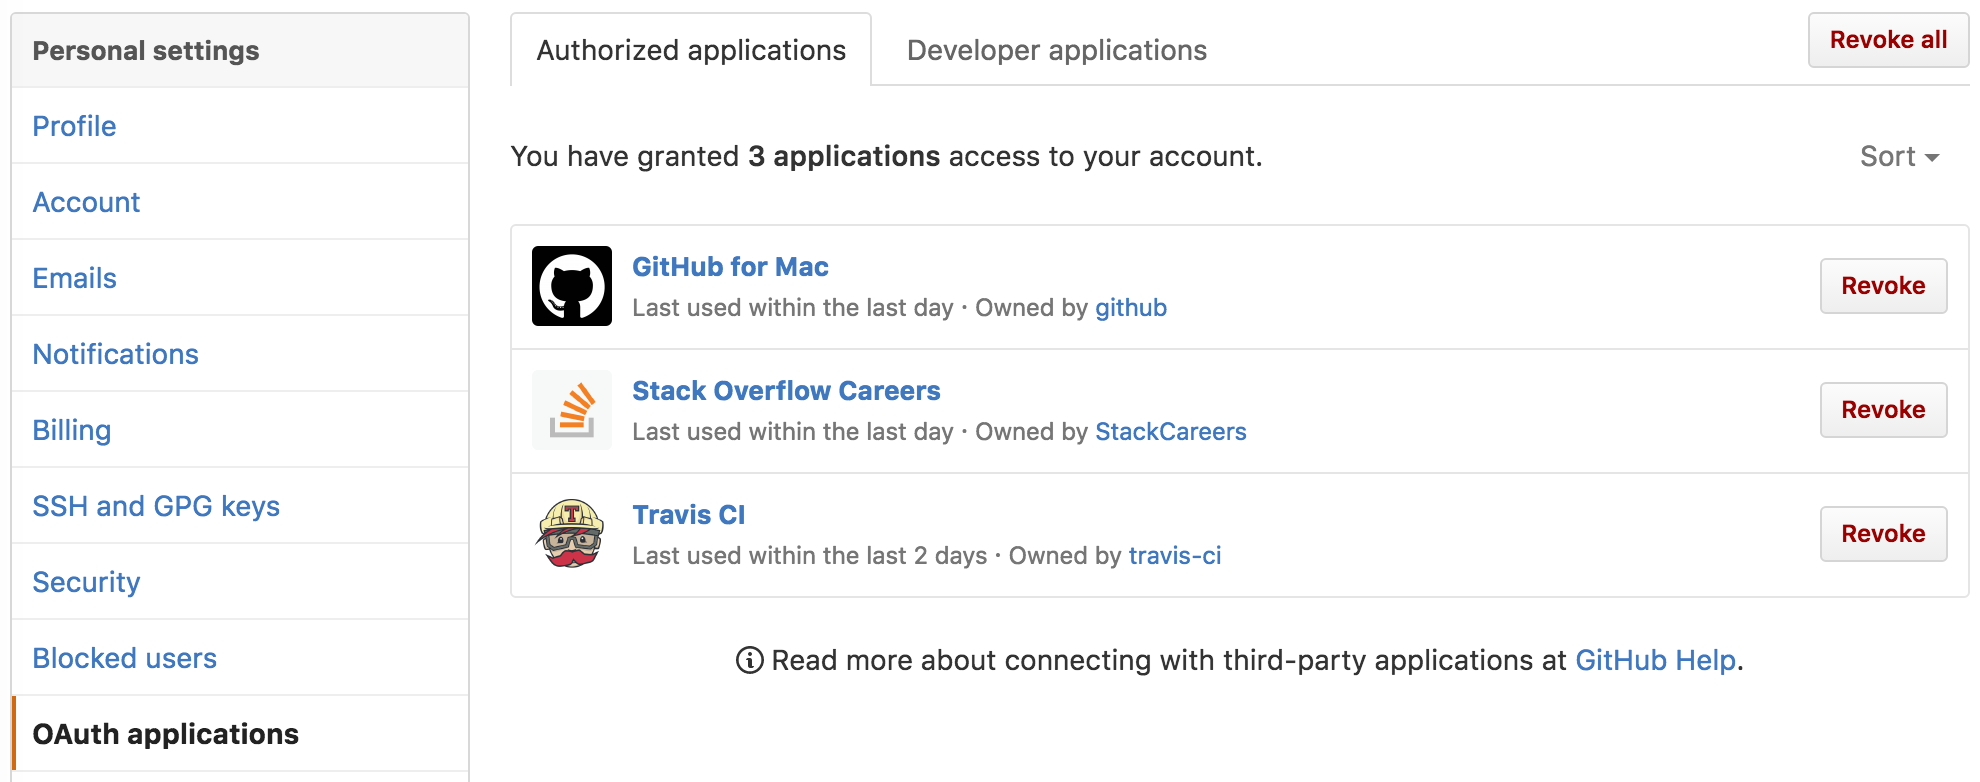
We’re not here to revoke access, but rather to grant it! I do feel obliged to tell you though, in order for this tutorial to really be complete.
Project setup
Before we open Xcode there is one important thing to go through. That is: what do you actually have in your repository. Yes, I’m talking about ignored files. There have been endless debates over whether or not to have Pods in your repo…that some people don’t have CocoaPods installed and thus wouldn’t be able to run the code immediately. No, just no. Stop right there. Would you sync Maven dependencies? I thought so.
Our .gitignore looks like this:
.DS_Store
build/
*.pbxuser
!default.pbxuser
*.mode1v3
!default.mode1v3
*.mode2v3
!default.mode2v3
*.perspectivev3
!default.perspectivev3
*.xcworkspace
!default.xcworkspace
xcuserdata
profile
*.moved-aside
DerivedData
.idea/
Pods
I found it on Stack Overflow a couple years back and it has never failed me. Also, by incorporating Travis in your CI pipeline, you pretty much test every time that the dependencies are downloaded correctly and that the project builds correctly.
Podfile
As you probably know, but in case you didn’t, starting with CocoaPods 1.0 you always have to define your target in your Podfile. Nothing hard, actually. Ours looks like this:
platform :ios, '9.0'
use_frameworks!

target "Gigsterous" do
  pod 'MBProgressHUD', '~> 0.9.1'
end
Xcode
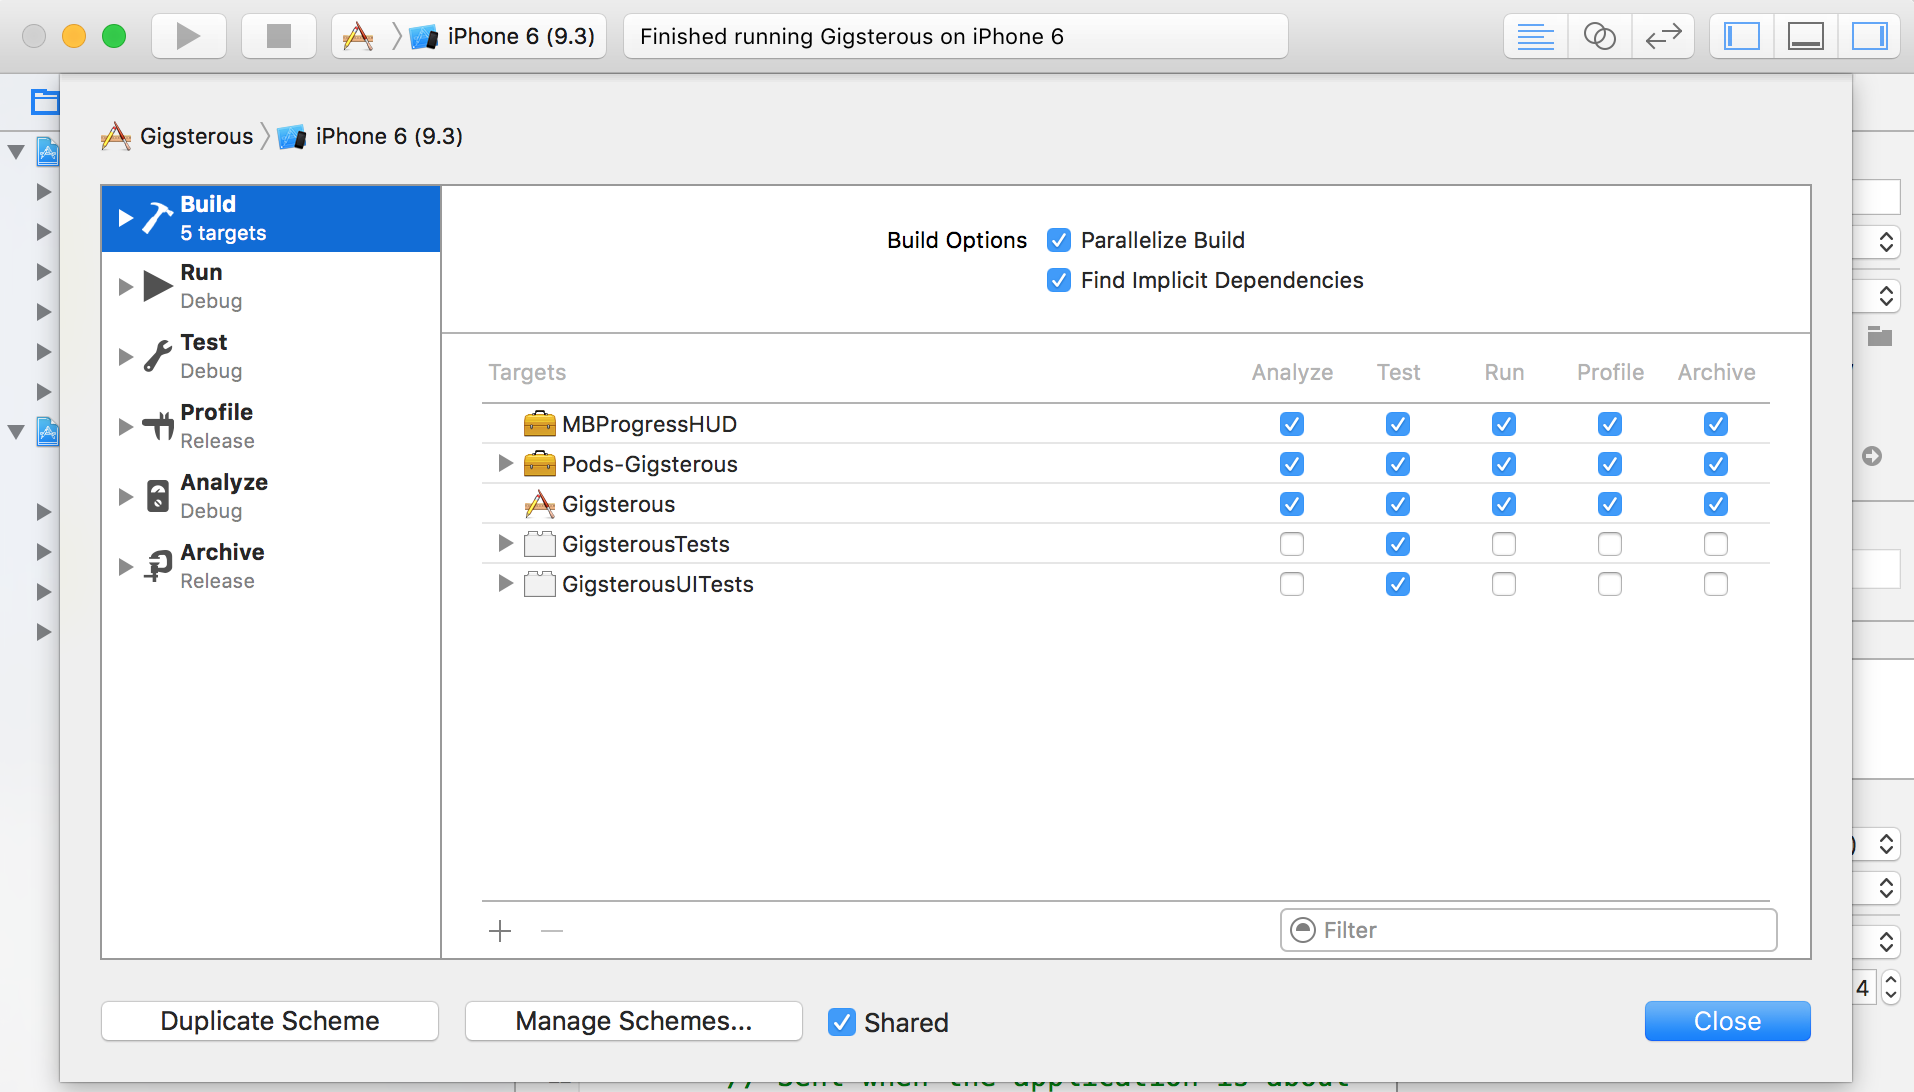
This part of the tutorial was the one that was somehow kept secret from me and why I wasn’t able to build the project on Travis. Whenever you want to have a project be automatically built along with CP dependencies, you have to add them to the scheme. Scheme? What? No worries, I got you covered. To find schemes of your app go to Product > Scheme > Manage Schemes…:
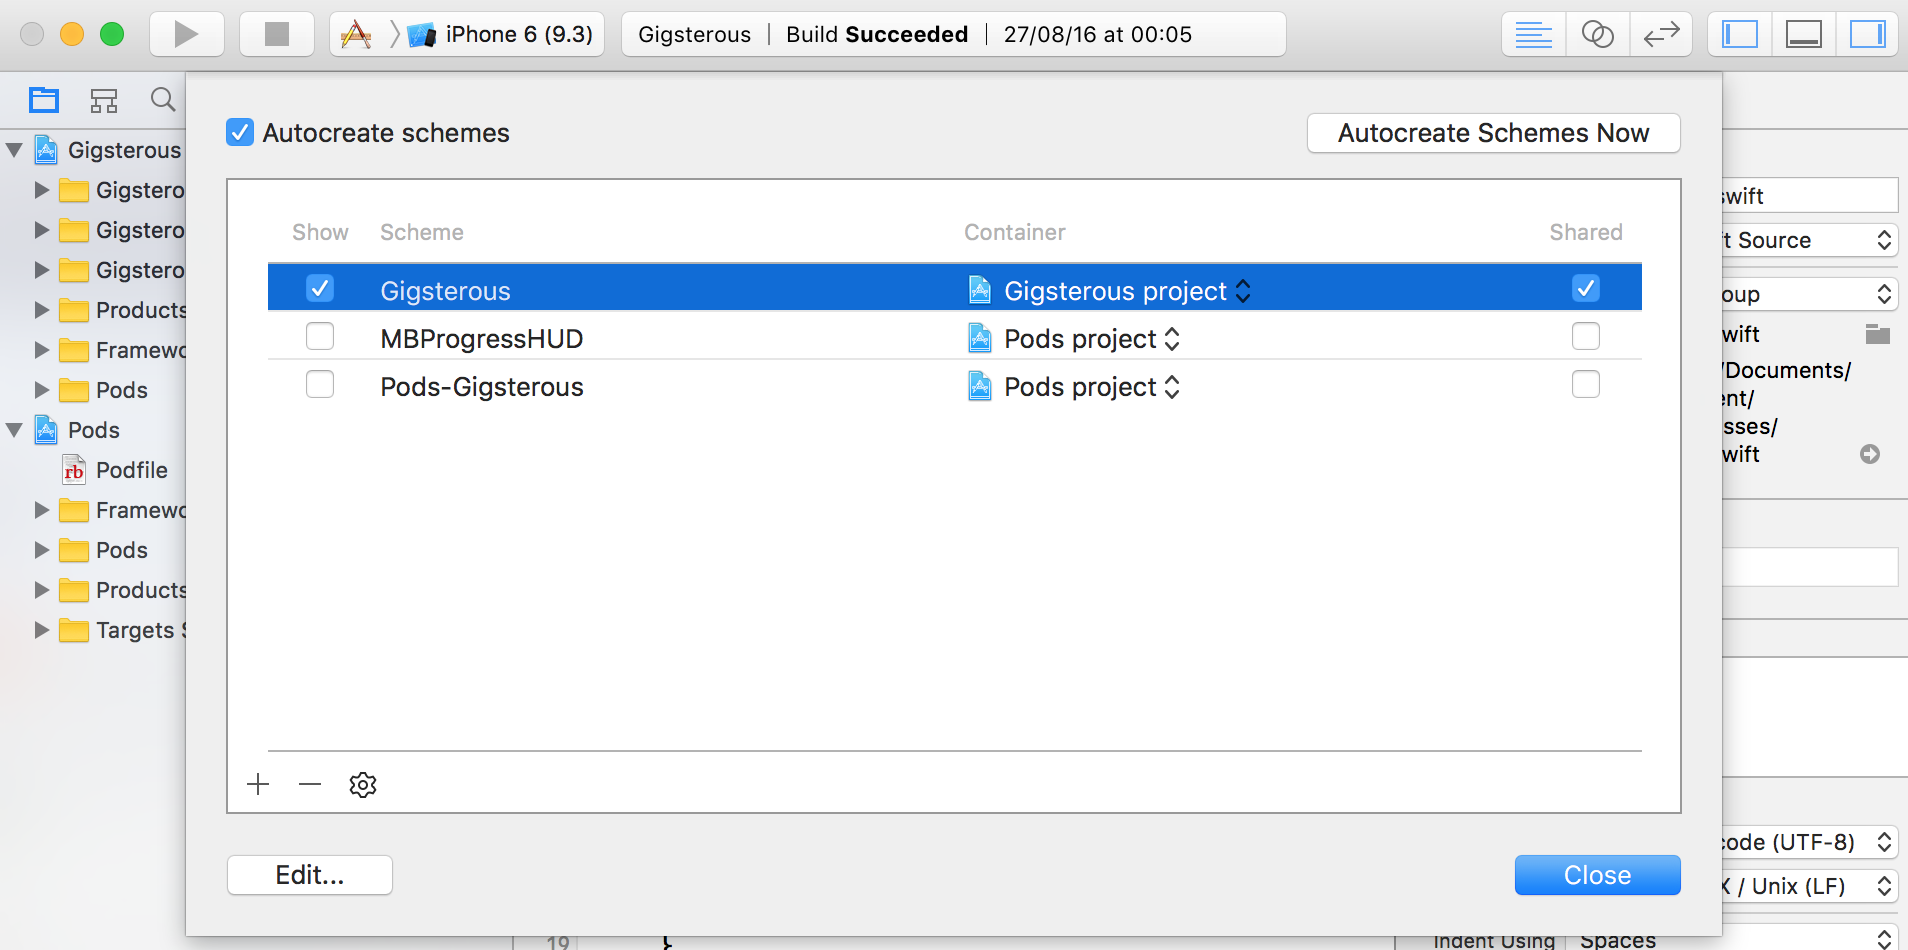
Make sure the scheme is Shared, then mark it and hit the Edit… button. From there, select the Build option in the left pane. You may notice that in the Targets section in the middle pane something is missing - YES, none of the Pods are there. So go ahead, hit the left bottom plus button and add all your Pods to the build scheme. Then, grab all pod-related targets and move them to the top of the list. You should end up with something very similar to this:
Travis YAML file
The last component that puts it all together is the “recipe” for Travis to use. It’s essentially a configuration file listing all the steps and necessary pre-conditions for a successful build to happen. You can also include multiple goodies such as SwiftLint or your unit tests.
So what is it? It’s just a simple YAML file, neatly structured into logical blocks. Ours looks like this:
language: objective-c
osx_image: xcode7.3

branches:
  only:
    - develop
    - master
env:
  - LC_CTYPE=en_US.UTF-8 LANG=en_US.UTF-8
before_install:
  - rvm install ruby-2.2.2
  - gem install cocoapods
  - gem install xcpretty -N
  - brew update
  - brew install swiftlint || true
script:
  - set -o pipefail
  - xcodebuild -workspace Gigsterous.xcworkspace -scheme Gigsterous -sdk iphonesimulator ONLY_ACTIVE_ARCH=NO | xcpretty -c
  - swiftlint
It can get waaaay more complicated, but this one works for us for now. Let’s break it down block by block:
- The top always includes the top level specification - language and platform. In our case it’s an objective-c/swift and xcode7.3 environment. Xcode 8 is currently in beta in Travis, but as soon as it’s live, we’ll switch over as well.
- Next you define which branches you want Travis to build (including incoming pull requests). As you may have noticed, we are using the full gitflow.
- Optionally you can specify extra requirements for your environment. I personally prefer when the image is a clean UTF-8 environment.
- Many things can happen before the actual build. In our case, we make sure we have the right version of Ruby in order to have CocoaPods 1.0 fully functional and we also install a great formatting tool called xcpretty to make the logs coming out of xcodebuild a bit more readable.
- And at the very end is the script - nothing fancy, sets the pipefail, calls the build and then performs lint check to make sure our code is not only running well, but also in a good condition.
And that should do it! Feel free to adjust/delete/add anything and add it to your code to make it as smooth as possible. If you have a simple git workflow (commit + push straight to master), then there’s no catch - go ahead, push and enjoy. If you have multiple branches it can get a bit tricky because since we turned Travis off in the event of .travis.yml file being missing, turning it back on doesn’t trigger the build. You first have to enable it, then push again into the PR branch and then it will trigger the build. If you just push into the master, it will naturally start building automatically as well.
Summary
That’s it for today! I hope this post helped you with your first Travis setup. I’m almost 100% sure we went through every step in order to be successful with Travis. If something doesn’t sound right or if you have any questions, feel free to drop me a tweet!
![]()